Manny went on a quick field trip to the Dollar Tree and came upon some items, and then a one of a kind pumpkin wreath was created.

Materials:
1.) 2 wire wreath forms 14in
2.) Jack O Lantern wooden plaque
3.) Round plastic Platter
4.)A couple of small wooden beads, larger beads
5.)Hot Glue Gun
6.)Fairy Lights
7.)2 Packages of Pumpkin lights (12 a pack).
8.) Real Orange/Marygold Spray Paint
9.) Wood burning tool
10.) Floral wire/wire cutter⬇️⬇️

Let’s get started making a set of two holes to your tray using the wood burning tool ( I spaced them out by 1 inch.) This will allow to thread in the wire to secure to your plastic tray. I poked 4 sets of holes on my tray (north,south,east and west.⬇️⬇️


Next, cut some floral wire ( I did not measure my pieces, I cut enough to create a knot.) Once you have all your pieces cut then place one of your wire forms over the tray facing up, then start threading your wire from front to back (repeat to all three sets of holes)⬇️⬇️


Once your pull the wire to the back side of the tray then tightly twist the wire to secure (repeat on all three sets of holes).⬇️⬇️

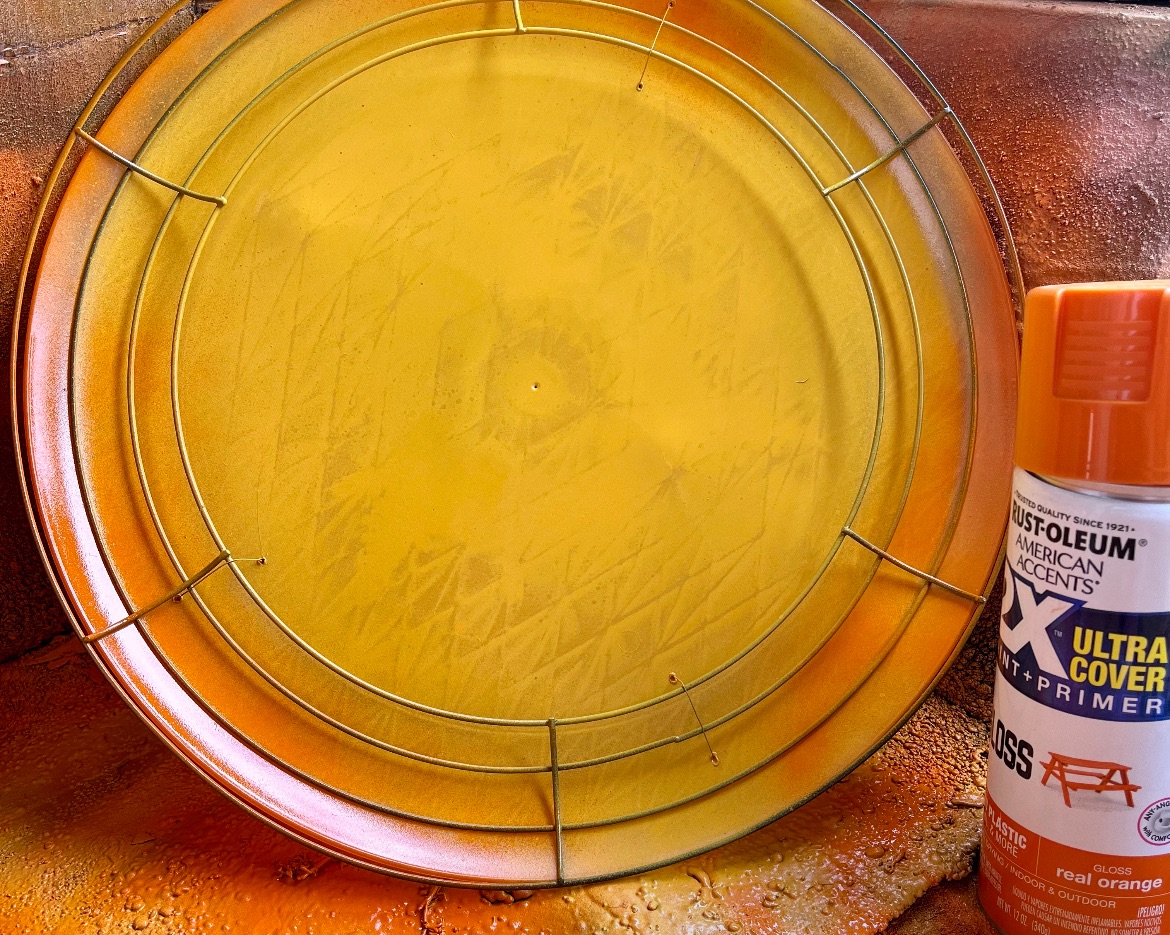
Once the tray and wire form are secured then its time to spray, start with the yellow color in the center . (It’s Ok if you go over the wreath form).⬇️⬇️

Spray orange on the edge of the tray and over the wire form as the pumpkin lights will be placed in that section.⬇️⬇️

You will also need to spray paint the second wire form as it will be placed over the other half.⬇️⬇️

Spray your pumpkin wood cutout with orange, if you want to use a bit of green and brown for more detail its optional.⬇️⬇️


Start by gluing the smaller beads on the back of pumpkin cut out as they will serve as support while wiring the fairy lights.⬇️⬇️


Glue the larger beads to the back of the pumpkin cut out as these will be used to attach the cut out to the plastic tray.⬇️⬇️


Apply glue to the larger beads and flip it over to glue down make sure its centered.⬇️⬇️


No start by placing the pumpkin lights around and over the pumpkin form, and hide the wire under the wooden piece. ⬇️⬇️

I placed the pumpkin lights at an angle so they are able to fit better.⬇️⬇️


I had four pumpkin lights left over and i pulled out the lights and just tucked them under the other pumpkins.⬇️⬇️

Once you have arranged them then place the second wreath form over and get ready to wire it down.⬇️⬇️

Once again cut four pieces of floral wire (as mentioned before I did not measure, I cut enough wire to be able to make a knot). ****Quick tip I spray painted my wire orange to blend in with the orange wire form.⬇️⬇️

Thread the wire from the inside part of the wire form and pull both ends up, slight move them to the bottom part to hide the knot after twisting. Cut your wire ends and tuck it in to prevent the sharp ends to show, you can even add a small dab of hot glue to the sharp ends.⬇️⬇️

Repeat the same step and wire the remaining three strands around the wreath to secure the top wire form (North, South, East and West)⬇️⬇️

The last steps is to cut the loose ends on the back of your tray and add some glue to cover the sharp ends.⬇️⬇️

You’re almost done! Now lets add a hanger, I used Dollar Tree Halloween ribbon. I also used small pieces of paper to glue over the ribbon for more support. ** You can make you hanger to you desired length.⬇️⬇️

The last step is to glue your light packs on the back of the plastic tray.⬇️⬇️

Congratulations! You are done and now its time to light it up! Voila you have created a one of a kind Pumpkin Wreath.⬇️⬇️


Leave a Reply